WLS 3.7 introduces the ability to read settings from a remote location, optionally based on host attributes. This provides a dynamic way to update settings on hosts without using GPO, and the ability to deploy WLS without a base configuration file (initial.xml), separating the deployment and configuration for easier management in complex environments.
Remote Location
The remote location can be a file share or web site. It is recommended that a file share have proper ACLs applied, specified by FQDN, and DNSSEC enabled. If a web site is used, HTTPS is recommended and must have a valid certificate.
The rules.xml and any qualifying XML settings files are read and cached on the host. At the specified Interval, WLS will check for changes based on the specified UpdateCheckType. File share paths default to checking the Last Modified Date metadata. Web site paths default to checking the Last Modified Date and ETag metadata returned from a HEAD request. UpdateCheckType can be configured to require a full content comparison at each interval. If the metadata has changed a full content comparison is done and settings are only applied if the content has changed.
If the system is unable to reach the remote configuration path, the cached rules.xml will be evaluated and qualifying cached XML settings will be used as the original paths are cached as well.
Rules
The rules.xml must be located at the root of the remote location. Each rule specifies one or more conditions and a URL to read settings from for hosts that match all conditions. The URL can be relative to the remote location or an absolute path to another location. URLs evaluated from the rules.xml can contain XML settings files by any name. A rule can be set to stop processing further rules by setting continue to false.
Conditions
A condition can either be a “host” or “wmi” condition. A host condition can be the hostname, OU, DN, or any environmental variable for the “Local System” user. A WMI condition can use any WMI namespace and class available to “Local System”.
Each condition can specify one or more fields. Each field can specify zero or more values. Each value can be an exact match, wildcard (*, #, ?), or regular expression. For fields where more than one value may be returned, each value is compared against the values specified. If no value is specified all values will be used when evaluating tokens.
Tokens are optional and can be specified for one or more fields. The token can then be used as part of the URL to dynamically change the location or file name of the XML settings file to be read if all conditions are met.
Example rules.xml
The example below shows reading settings for a Dell computer in an OU named “Windows 10”. The URL is relative and based on the tokens from the conditions.
<WLS>
  <rules>
    <rule name="Dell in Win10 OU">
      <!--Just an example. URL is a relative path to RemoteConfigurationURL-->
      <host>
        <!--Example condition comment-->
        <fields>
          <field>
            <!--Example field comment-->
            <name>OU</name>
            <!--Example value comment-->
            <value>Windows 10</value>
            <token>ou</token>
          </field>
        </fields>
      </host>
      <wmi>
        <namespace>root\cimv2</namespace>
        <class>Win32_ComputerSystem</class>
        <!--Second condition comment-->
        <fields>
          <field>
            <!--wmi field comment-->
            <name>Manufacturer</name>
            <value>Dell*</value>
            <token>mfr</token>
          </field>
        </fields>
      </wmi>
      <url>$ou$\$mfr$\settings.xml</url>
    </rule>
  </rules>
</WLS>
This example shows reading settings for any manufacturer in the “Windows 10” OU. No value needs to be specified if all values for a field will be used. Failed attempted paths will be logged based on the LogMissingFiles setting.
<WLS>
  <rules>
    <rule name="Dell in Win10 OU">
      <!--Just an example. URL is a relative path to RemoteConfigurationURL-->
      <host>
        <!--Example condition comment-->
        <fields>
          <field>
            <!--Example field comment-->
            <name>OU</name>
            <!--Example value comment-->
            <value>Windows 10</value>
            <token>ou</token>
          </field>
        </fields>
      </host>
      <wmi>
        <namespace>root\cimv2</namespace>
        <class>Win32_ComputerSystem</class>
        <!--Second condition comment-->
        <fields>
          <field>
            <!--wmi field comment-->
            <name>Manufacturer</name>
            <token>mfr</token>
          </field>
        </fields>
      </wmi>
      <url>$ou$\$mfr$\settings.xml</url>
    </rule>
  </rules>
</WLS>
Settings
A settings.xml may be located at the root of the remote location. If present it will be applied to all hosts. XML settings file content is the same format as the initial.xml and the WLS Configuration Editor should be used to generate them. Settings files are processed in the order they appear in the rules.xml. Settings are overlaid such that the last setting will overwrite a previous setting.
XML Integrity and Verification
XML files should be digitally signed to ensure content has not changed. XML files can be signed with a certificate to ensure the content integrity and that it was signed by a trusted entity. The tooling to sign and verify is included with the Remote Configuration Rule Editor and the Configuration Editor.
Signing
From either tool, choose File->Sign XML. A prompt will appear asking if you have a certificate, choosing Yes will show the available certificates or let you choose one from disk and ask for the PIN/password if needed, choosing No will use a system generated certificate. Each tool can also have a default certificate chosen to avoid being prompted.
A system generated certificate will verify the content only. A user specified certificate will verify content and that the signer is trusted by the host. After signing a verification is performed and the results displayed to the user.

A signature block will be added to the end of the XML file. Any previous signature will be removed.
System generated certificate
<WLS>
  <rules>
  ...
  </rules>
<RSAKeyValue><Modulus>...</Modulus><Exponent>...</Exponent></RSAKeyValue><Signature xmlns="http://www.w3.org/2000/09/xmldsig#"><SignedInfo><CanonicalizationMethod Algorithm="http://www.w3.org/TR/2001/REC-xml-c14n-20010315" /><SignatureMethod Algorithm="http://www.w3.org/2001/04/xmldsig-more#rsa-sha256" /><Reference URI=""><Transforms><Transform Algorithm="http://www.w3.org/2000/09/xmldsig#enveloped-signature" /></Transforms><DigestMethod Algorithm="http://www.w3.org/2001/04/xmlenc#sha256" /><DigestValue>.../DigestValue></Reference></SignedInfo><SignatureValue...</SignatureValue></Signature></WLS>
User certificate
<WLS>
  <rules>
...
  </rules>
<Signature xmlns="http://www.w3.org/2000/09/xmldsig#"><SignedInfo><CanonicalizationMethod Algorithm="http://www.w3.org/TR/2001/REC-xml-c14n-20010315" /><SignatureMethod Algorithm="http://www.w3.org/2001/04/xmldsig-more#rsa-sha256" /><Reference URI=""><Transforms><Transform Algorithm="http://www.w3.org/2000/09/xmldsig#enveloped-signature" /></Transforms><DigestMethod Algorithm="http://www.w3.org/2001/04/xmlenc#sha256" /><DigestValue>...</DigestValue></Reference></SignedInfo><SignatureValue>...</SignatureValue><KeyInfo><X509Data><X509Certificate>...</X509Certificate></X509Data></KeyInfo></Signature></WLS>
Remote Configuration at Installation
WLS can be deployed without an initial.xml by specifying a RemoteURL as a command line parameter to msiexec.exe. The rules.xml must be signed when specified at installation.
Examples:
msiexec.exe /i setup.msi /qn RemoteURL= "\\server\WLS"msiexec.exe /i setup.msi /qn RemoteURL= "https://server/WLS"A minimal initial.xml that specifies the RemoteConfiguration URL may also be used.
<WLS>
  <Config>
    <RemoteConfiguration>
      <URL>https://server/WLS</URL>
    </RemoteConfiguration>
  </Config>
</WLS>
Tooling
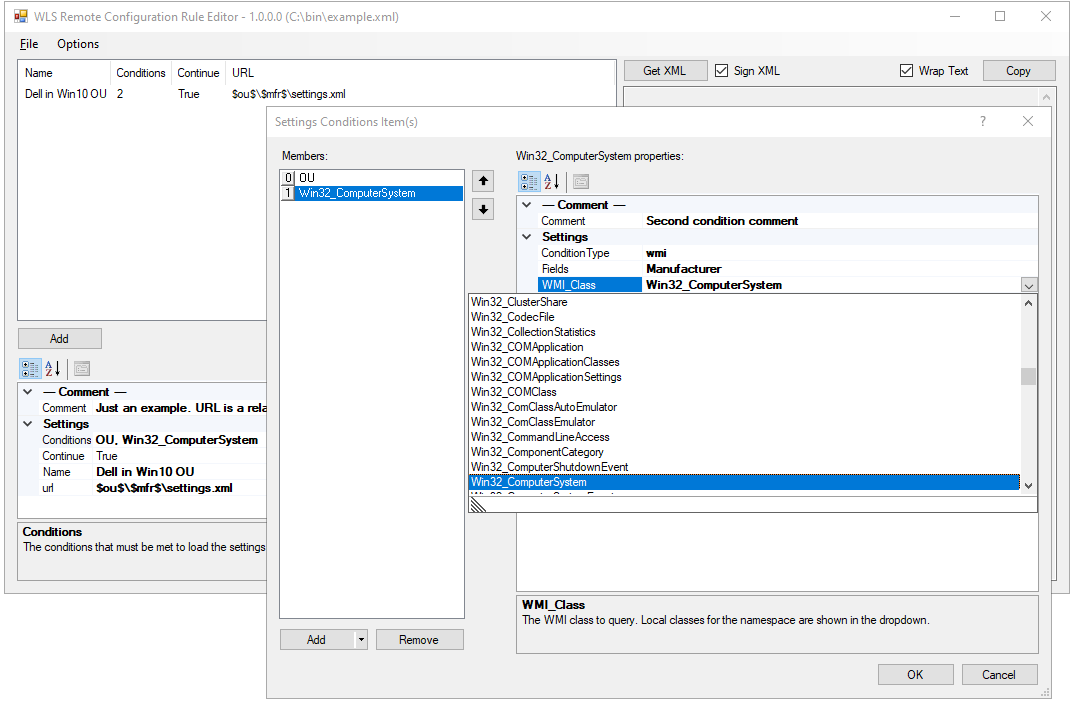
The Remote Configuration Rule Editor is provided to help with creating the rules.xml file. XML is the native format used and it can be edited without the use of the editor. If the file is signed, editing the file will invalidate the signature until it is resigned for the new content. Rule names and any comments are for user reference only and are not used by WLS.

Rules are added and removed using the appropriate buttons. Rules can be reordered by dragging and dropping.
Where possible the editor will show available field names, values, WMI namespaces, and WMI classes. Field names, namespaces, and classes are free-form text fields and can specify values not available on the local system that may be available on other systems.


Logs and Dashboard
All relevant Remote Configuration activity is logged and a Splunk dashboard is provided in the WLS App for Splunk.

For more information on WLS, click “WLS Information” at the top, or here: WLS Information
If you’d like licensing or other information about WLS, send me a note via the contact form. WLS is currently available to US entities, but does require a signed license agreement.

